Windows Phone 7 可以把它看成是Android 的 ListView ,WP7 只是预先在XAML里面为它的数据模板规定了格式,而Android 可以通过后期引入数据的方式为其添加数据模板。
Android 我们可以通过以下几种方式为LISTVIEW 添加数据,用法极其简单:
- 继承ListActivity,使用SetListAdapter,参考下面的代码。
<!--<br /><br />Code highlighting produced by Actipro CodeHighlighter (freeware)<br />http://www.CodeHighlighter.com/<br /><br />-->setListAdapter(newArrayAdapter<String>(this,
android.R.layout.simple_list_item_1,mStrings));
- 可自定义数据源,继承BaseAdapter ,参考下面代码。

 自定义数据源
<!--<br /><br />Code highlighting produced by Actipro CodeHighlighter (freeware)<br />http://www.CodeHighlighter.com/<br /><br />-->privateclassSlowAdapterextendsBaseAdapter{
privateLayoutInflatermInflater;
publicSlowAdapter(Contextcontext){
mContext=context;
mInflater=(LayoutInflater)context.getSystemService(Context.LAYOUT_INFLATER_SERVICE);
}
/**
*Thenumberofitemsinthelistisdeterminedbythenumberofspeeches
*inourarray.
*
*@seeandroid.widget.ListAdapter#getCount()
*/
publicintgetCount(){
returnmStrings.length;
}
/**
*Sincethedatacomesfromanarray,justreturningtheindexis
*sufficenttogetatthedata.Ifwewereusingamorecomplexdata
*structure,wewouldreturnwhateverobjectrepresentsonerowinthe
*list.
*
*@seeandroid.widget.ListAdapter#getItem(int)
*/
publicObjectgetItem(intposition){
returnposition;
}
/**
*Usethearrayindexasauniqueid.
*
*@seeandroid.widget.ListAdapter#getItemId(int)
*/
publiclonggetItemId(intposition){
returnposition;
}
/**
*Makeaviewtoholdeachrow.
*
*@seeandroid.widget.ListAdapter#getView(int,android.view.View,
*android.view.ViewGroup)
*/
publicViewgetView(intposition,ViewconvertView,ViewGroupparent){
TextViewtext;
if(convertView==null){
text=(TextView)mInflater.inflate(android.R.layout.simple_list_item_1,parent,false);
}else{
text=(TextView)convertView;
}
if(!mBusy){
text.setText(mStrings[position]);
//Nulltagmeanstheviewhasthecorrectdata
text.setTag(null);
}else{
text.setText("Loading...");
//Non-nulltagmeanstheviewstillneedstoloadit'sdata
text.setTag(this);
}
returntext;
}
/**
*Rememberourcontextsowecanuseitwhenconstructingviews.
*/
privateContextmContext;
}
- 由于Android 默认提供了多种自定义数据源的格式模板给我们,所以用起来非常方便有多种可供选择:
SimpleAdapter,SimpleCursorAdapter,ArrayAdapter<?>等,具体可在具体的项目上实施使用。
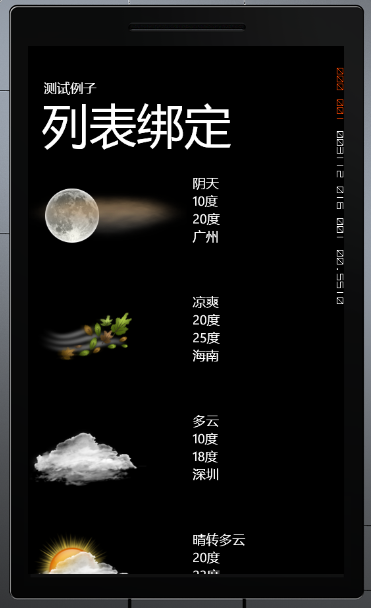
本篇将着重介绍WP7 的ListBox 一个我自认为非常简单方便的数据绑定方法。并且通过Silverlight 特有的数据绑定方法在XAML绑定数据。本篇学习笔记将以一个呈现天气列表的LISTBOX的例,效果如下:
实现这个功能我们需要编写一个Model 己记录这些实体信息,Model代码如下:
<!--<br /><br />Code highlighting produced by Actipro CodeHighlighter (freeware)<br />http://www.CodeHighlighter.com/<br /><br />-->publicclassweather
{
publicstringConditions{get;set;}
publicstringImageUrl{get;set;}
publicstringLow{get;set;}
publicstringHigh{get;set;}
publicstringLocation{get;set;}
publicweather(stringconditins,stringimageurl,stringlow,stringhigh,stringlocation)
{
this.Conditions=conditins;
this.ImageUrl=imageurl;
this.Low=low;
this.High=high;
this.Location=location;
}
}
并且我们还需要一个类来做为ListBox 的数据源,前篇有讲过数据绑定的一篇文章提到过ObservableCollection 不知道大家还有没有印象,本篇就是使用这个数据集合来做ListBox 数据源,该类代码如下:
<!--<br /><br />Code highlighting produced by Actipro CodeHighlighter (freeware)<br />http://www.CodeHighlighter.com/<br /><br />-->publicclassweathers:List<weather>
{
privateconststringimageUrl="../images/";
publicweathers()
{
BuildCollection();
}
publicObservableCollection<weather>DataCollection{get;set;}
publicObservableCollection<weather>BuildCollection()
{
DataCollection=newObservableCollection<weather>();
DataCollection.Add(newweather("阴天",imageUrl+"19n.png","10度","20度","广州"));
DataCollection.Add(newweather("凉爽",imageUrl+"23d.png","20度","25度","海南"));
DataCollection.Add(newweather("多云",imageUrl+"26n.png","10度","18度","深圳"));
DataCollection.Add(newweather("晴转多云",imageUrl+"27d.png","20度","23度","三亚"));
DataCollection.Add(newweather("阴转多云",imageUrl+"27n.png","22度","23度","揭阳"));
DataCollection.Add(newweather("晴天",imageUrl+"31d.png","22度","25度","汕头"));
returnDataCollection;
}
}
实体类和数据源代码编写完成后,接下来打开mainPage.xaml,添加一个命名空间:
<!--<br /><br />Code highlighting produced by Actipro CodeHighlighter (freeware)<br />http://www.CodeHighlighter.com/<br /><br />-->xmlns:data="clr-namespace:ListBoxDatBind"
Tip:这里指定的是你的数据源所在的命名空间。
之后,添加一个页面的资源KEY
<!--<br /><br />Code highlighting produced by Actipro CodeHighlighter (freeware)<br />http://www.CodeHighlighter.com/<br /><br />--><phone:PhoneApplicationPage.Resources>
<data:weathersx:Key="weatherCollection"/>
</phone:PhoneApplicationPage.Resources>
准备工作准备完成,为ListBox 绑定数据:
<!--<br /><br />Code highlighting produced by Actipro CodeHighlighter (freeware)<br />http://www.CodeHighlighter.com/<br /><br />--><ListBoxName="listBox1"
ItemsSource="{BindingSource={StaticResourceweatherCollection},Path=DataCollection}">
<ListBox.ItemTemplate>
<DataTemplate>
<StackPanelOrientation="Horizontal">
<ImageSource="{BindingPath=ImageUrl}"/>
<StackPanelOrientation="Vertical">
<TextBlockText="{BindingConditions}"/>
<TextBlockText="{BindingLow}"/>
<TextBlockText="{BindingHigh}"/>
<TextBlockText="{BindingLocation}"/>
</StackPanel>
</StackPanel>
</DataTemplate>
</ListBox.ItemTemplate>
</ListBox>
运行的效果如上图。
个人觉得,要论数据绑定的话,还是Android 的 ListView 来得灵活一点,不过Wp 7 的数据绑定却在微软的封装下来得方便许多。
源码下载:
数据绑定
分享到:


相关推荐
android ListView绑定Windows Phone 7 不温不火学习之《ListBox 数据与Android ListView 数据绑定》-ListBoxDatBind
listbox数据绑定 Windows Phone 7 可以把它看成是Android 的 ListView ,WP7 只是预先在XAML里面为它的数据模板规定了格式,而Android 可以通过后期引入数据的方式为其添加数据模板。
Windows Phone 7 中ListBox的使用
绑定数据源到ListBox控件.rar 绑定数据源到ListBox控件.rar
学习windowsphone7 listbox的小例子,适合初学者
wpf修改ListView和ListBox风格,介绍了在wpf中ListView和ListBox的使用
用listBox和listView实现不同的效果...
C# listBox绑定数据库 以及DropDownList 资源大家一起分享
采用客户端绑定ListBox控件的数据源,进行客户端多选,用于选择数据记录操作多选操作的控件,客户端选择操作,简单方便。
WPF/C#中的ListView、ListBox的背景样式、 选中行样式,可自定义选中行项的背景颜色、圆角、方形等任意形状的背景以及前景色!以ListView为例说明,使用时如下: <ListView ItemContainerStyle="{DynamicResource ...
给listbox绑定webService调用的数据,对于listbox的绑定和webService异步调用的展示
Android支持横行滚动的ListView控件
实现ListBox控件与ListBox控件交换数据
wpf 集合绑定 Comobox ListBox等
行与行太紧了,不好看呀。 有办法可以实现吗? 我不想通过加大字体的方法,因为字体大了,行距还是近呀。 我要的是增大行间距。 二、解决方法: // // imageList1 // this.imageList1.ImageSize = new System....
C#编程 本代码利用文件流技术实现对于listBox和listView与文本文件的传值,熟悉此代码可充分掌握文件流技术和listBox和lsitView的使用
本文实例讲述了winform中的ListBox和ComboBox绑定数据用法。分享给大家供大家参考。具体实现方法如下: 本例实现将集合数据绑定到ListBox和ComboBox控件,界面上显示某个属性的内容,代码如下: 代码如下: //… //...
listview+listbox MVVMLight下动态添加控件
Check,ListBox等窗体常用元素的实例,利用MSFlexGrid做的单元格输入示例,演示如何在MSFlexGrid单元格中绑定下拉列表、复先框、单选框(Combox,Check,ListBox)等,以方便用户输入和提高数据准确性。如果你是一位VB...
主要介绍了C#保存listbox中数据到文本文件的方法,涉及C#操作listbox数据的相关技巧,需要的朋友可以参考下